Quantcast
Channel: Decor You Adore
Viewing all 118 articles
Browse latest View live

How to buy and sell on Craigslist...LIKE A BOSS!

$
0
0

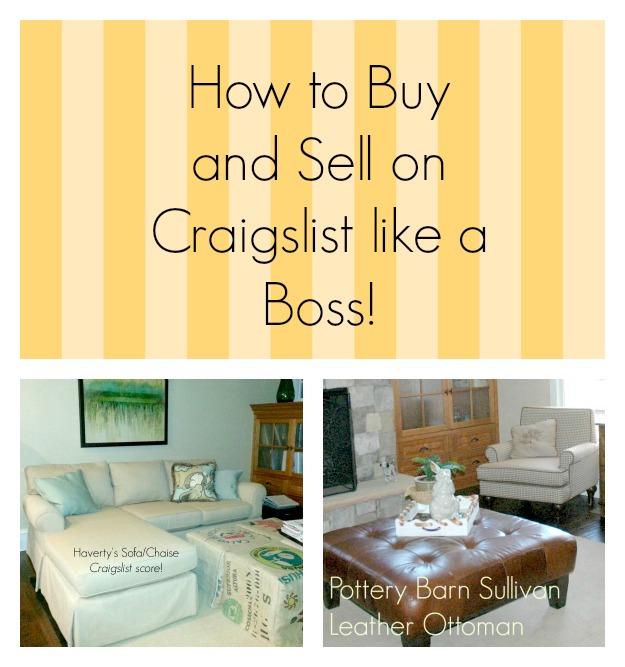
You know I LOVE Craig and his list. I'll tell you something else about me; two somethings. 

1. I am cheap a bargain hunter.

2. I don't like to leave the comfort of my sofa. (I found it on Craigslist!)
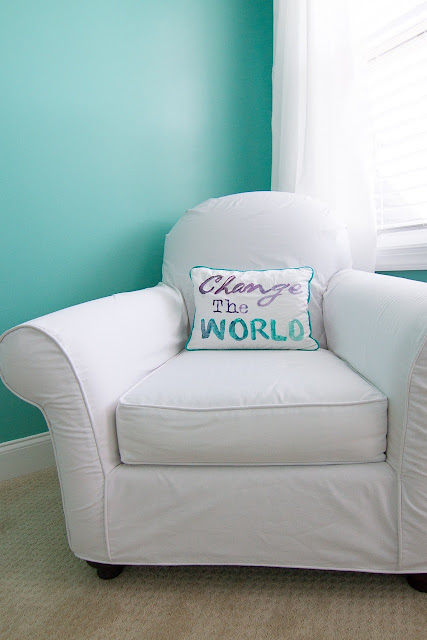
My CL score: A sofa/chaise which also serves as my desk, where I write the masterpieces you enjoy!


Having sold MANY things on Craigslist, I understand in order to be the one who "wins the bid" so to speak, 
you have to require nothing of the seller. 
What does that mean? Well, you must not ask questions about the piece or make a low ball offer, OR God forbid, ask, "Is this still available?" Delete, delete, delete. 


What gets my attention while selling is the same principle I've adapted for buying. Try this reply to the ad:

1. I'm interested in your Giant Velvet Elvis Painting.
2. I have a truck and an extra hand to help me load it.
3. I can come most anytime at your convenience.
4. I have cash in hand. 

That's it. 
No bargaining, no "what are the measurements", no "has it been peed on", no, no no. Make yourself available and negotiate when you get there when the seller does not want to see you walk away without Elvis. 


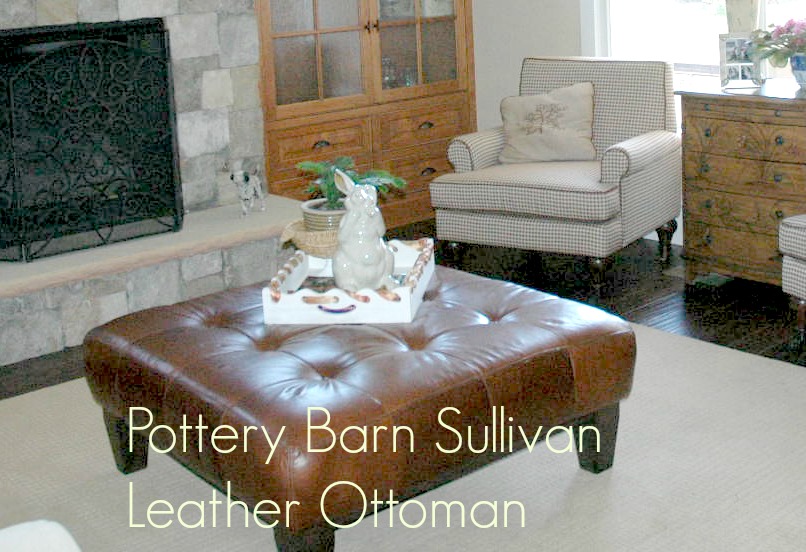
That tactic worked when I scored this Pottery Barn Sullivan ottoman, which they no longer sell. Only when I was standing in the chick's living room did I dare to negotiate the price. She didn't want to go through the trouble to get someone else out to her house as a potential buyer any more than I wanted to start the search all over again.

Craigslist Lesson: 
If it seems too good to be true, it probably is.
 
When to RUN like you are being chased by a bear:

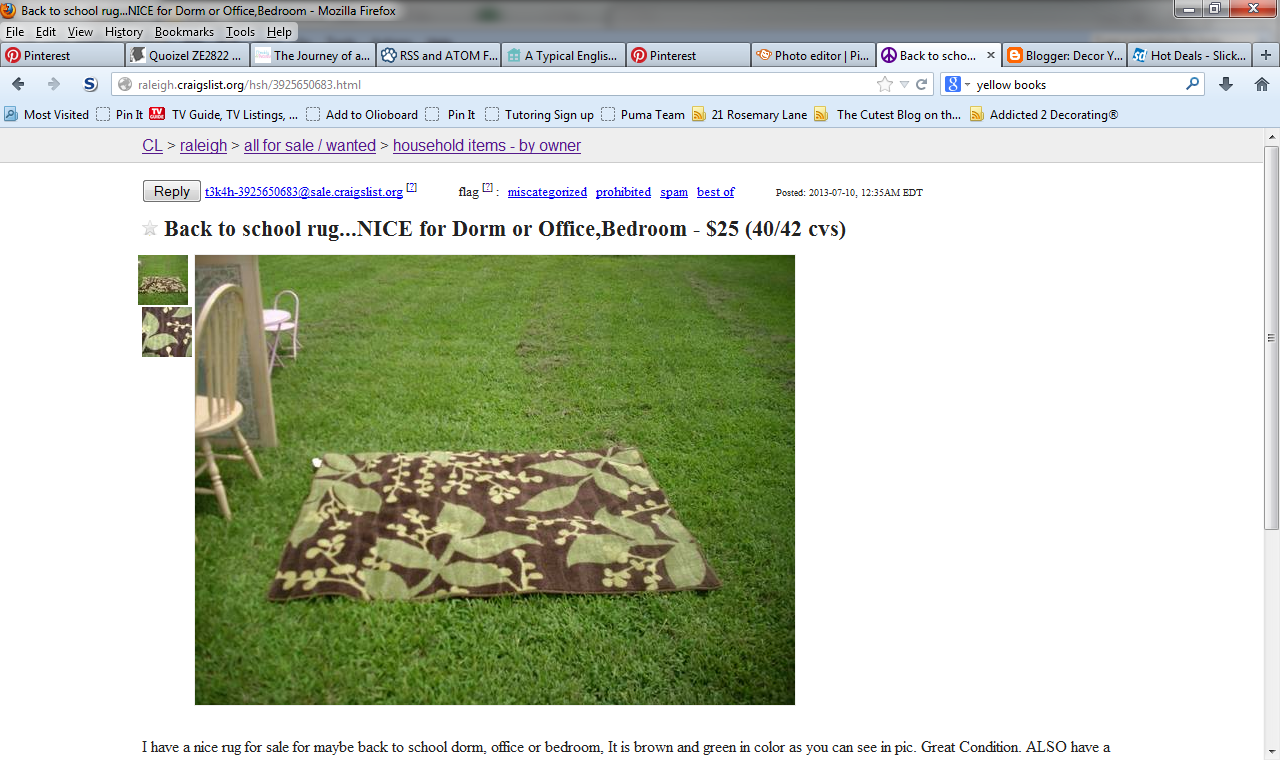
1. Take note of the details in the photograph. Notice this rug is outside. Read between the lines here people. This rug has been peed on by this guy's pit bull more times than he can count. It's outside because he tried to hose it down, but alas, the sun dried it and it still smells like DOG and PEE.
Run.


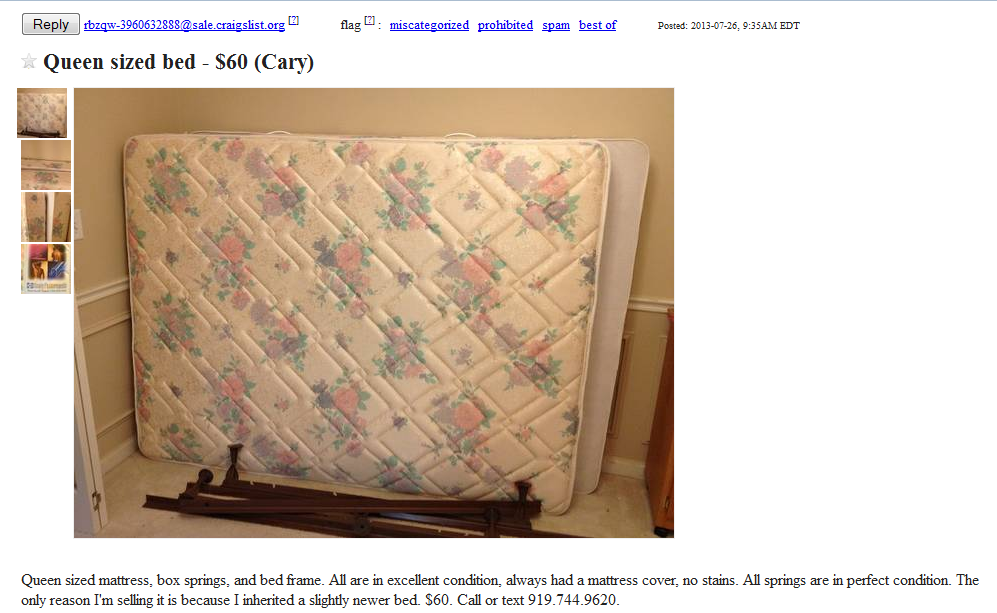
2. Don't even think about buying some body's used mattress. I might be cheap, but even I will spring for a new mattress that doesn't have someone else's bodily fluids soaked into it. 


Take note of the floral pattern on this mattress. I'm pretty sure mattress companies haven't made this pink, mint and lavender pattern in 25 years. And, I'll tell you what it's made of: 25 years of dust mite carcases.  PASS.


3. Look up the address on a map. If it takes you across the tracks and through the "hood", think about your safety and ask yourself, "Is that mid-century Knoll chair worth my life?"

"Whad'up Detroit?"

NO. The answer is NO.  (More on my adventures in downtown Raleigh next week). PASS. 

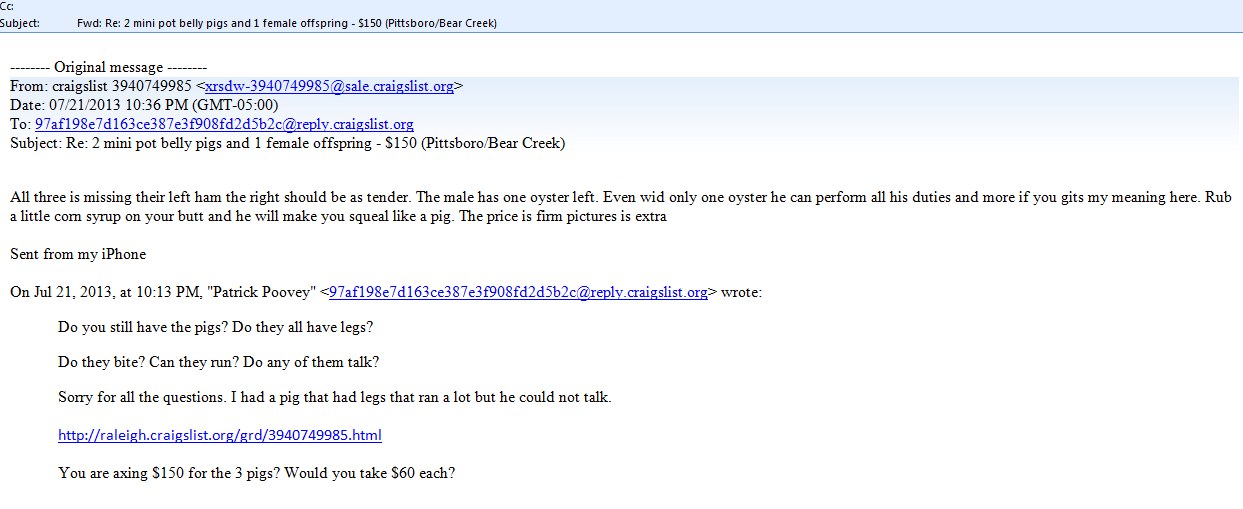
4. When the reply makes the hair on your neck stand up. That's a sign that the seller is a serious freak. This example is fake (thanks to my buddy Carl), but you get the idea...


 More next week on buying and selling on Craigslist like a PRO!


We're so thrilled to have been featured!


We're also linking up with The Dedicated House, Blissfully Domestic, and Shaken Together.

Blissful and Domestic

Shaken Together


Style Crush: Bar Carts

$
0
0

Lately I've been crushing on bar carts. Is it just me or are those glam little finds popping up everywhere? As I've said before, I'm not entertaining in the parlor on a regular basis. But, it sure is nice to have something swanky to look at when your guests come in the front door.

Even though I have no real idea where I would put one, I've been on the prowl for the one. I don't know what that looks like exactly but I'll know it when I see it.

Here's one from Crate & Barrel but I have to tell you its lacking that certain *something*. And for 600 smackers, it better look good AND serve a mean cocktail (or cup o' joe).


I really like this one. Simple, clean lines in black and white, but I'd rather have wheels.


coco+kelley
Of course the little doggie kinda sealed the deal for me. Which brings me to my next point.

The real secret to old Hollywood glam'ing your bar cart is all about the styling. Of course you will have a tray on your cart. You know we love trays! And you will NEED some accessories. For more great styling tips, look at how some of your HGTV faves would deck out these beauties, check out this 18 photo spread on their site.

What about this menagerie of bar cart yumminess?! Which one is your fave? I love the little blue one in the middle.


radaronthescene.com


I hope you're staying cool these last few days of July. We are feverishly getting school supplies ready and *trying* to get to bed early since school starts on Thursday for us. This summer of homelessness has just flown by! We're supposed to close on our new place next week so I'm sure we'll have all kinds of moving tales to tell. Stay tuned!


Smallest kitchen on earth gets a $26 upgrade

$
0
0
The world's smallest kitchen gets an upgrade! It's amazing what a little re-design can do for a space!

With my children at camp, we decided to take a quick, couples only trip to the beach. Normal people would be working on their tan in the peace & quiet....... but not us! We decided to do a little upgrade on the cottage kitchen. 


Smallest kitchen in the world. Precisely four inches of countertop (a.k.a. top of refrigerator) to make a sandwich.


I gotta tell you, it's tough making sandwiches for all five of us for a day on the beach on 4 tiny inches.

Question of the millenium: Why is there a laundry sink in the kitchen? Heck if I know!


Wouldn't a simple bar sink be better? I'm trying to convince Patrick to do the Ikea Boholmen sink with their birch wood butcher block countertops.

It's hard to go from this: 


Jacki's kitchen at home

To this:
Taking down the upper cabinet makes a huge difference, but we lost some storage space.

I found this piece at a thrift store on the island for $30. You can see it found a home in the bathroom, where else would you keep your dishes and peanut butter?


Model: Maddie
I found a solid core closet door at habitat and tried to use it for a desktop. 
See the office nook transformation here

After the makeshift office got an upgrade, we still had a closet door. And it was not going to go to waste!

We cut it down and rounded the corner and it made a perfect shelf for the microwave, freeing up valuable prep space! All we needed to add were a couple of brackets from Home Depot.

countertop remnant from Habitat ($6)

After trimming down the laminate remnant, we gained four square feet of Dagwood-sandwich-making delight.


 Love Habitat. Remember this CNN featured lantern we found at Habitat?


He looks cheerful here, but he's not thrilled to be working in such close quarters.


It doesn't seem like a big deal, but it is. Just think, we gave ourselves 75% more space for $26. That is frugal, functional and fabulous!!


Today we're linking up with these fine folks. Head on over and check out their creativity.


Skip To My Lou Sumo's Sweet Stuff  Keeping It Simple

Family Room Interior ReDesign: Working with what you have

$
0
0

We gave you a glimpse of our client's beautiful home last month and now we're back for redesign round 2!

With a big party on the horizon, the homeowners wanted to maximize the seating space and have the furnishings invite people to sit, enjoy a beverage and visit awhile. 

Prior to the decorating divas arrival, the furniture was "in a lineup" with the focus solely on the TV.

Before:


After:


Do you totally love this or what? I'm digging all the little conversation areas. Here's the breakdown of what we did:


1. Styled the bookcases to highlight meaningful family photos and momentos. We played up the color palate by selecting books with red and gold spines. (before bookcase pic?)

2. The tomato red chair and ottoman moved out of "the line-up" so that the person seated there could see the TV AND have a conversation. 

3. The bench from under the right window, moved to the left window to open up the walkway from the kitchen. 

4. We moved the existing gold chair out of the line-up and we added a chair from another part of the house to cozy up the space and encourage conversation. 

5. The gorgeous antique gate-leg table (moved from the foyer) replaced the existing low side table. 

6. Taller, more stately lamps (from upstairs) replaced the red ceramic ones (we repurposed those in the breakfast nook).


These simple changes yielded maximum impact. And, unlike those 30 minute shows on TV, we'll answer everyone's burning question. 

WHAT ABOUT ALL THE EMPTY SPACES YOU HAVE AFTER YOU "BORROWED" FROM OTHER ROOMS?

Well, I'm happy to report that we only had one space that needed to be "refilled". It was upstairs (out of the main living area) and our homeowner promptly went shopping!

We moved existing furniture and accessories to different, more appropriate spaces and ended up with furnishings that complement each other and work toward our goal of inviting, conversational space.


Admittedly, this homeowner was flush on furniture AND accessories. If that is not the case at your home, I suggest focusing on the public areas first. Try to imagine your guest's experience when they visit. Are they walking in to an overcrowded space full of furniture, mismatched accessories and a lego maze? Maybe you need a different perspective! Start by clearing the room so you have a clean visual field and go from there. Sometimes it helps to call a friend over for a fresh set of eyes. If you're absolutely stuck and need a hand, call or email us today and we would love to help you with your space--either in person or virtually!

Today we're linking up with these great bloggers:


Best Dining Room Pins

$
0
0
As Catherine obsesses over her dining space that isn't, it got me thinking....
I want a functional space for the twice a year dinner party, but can be purposeful on an everyday basis as well (like my farm table). My dining room is occupied by a gigantic 9 foot elephant, but I can appreciate an intimate space for entertaining. This got me thinking about  my dream dining room and what it might look like, which sent me on a quest to Pinterest. I've compiled my favorite dining room pins here.


Lofty Lovin featured an amazing loft space with this swingin' dining room. Who doesn't love to swing?

I'm not a huge fan of pink, but this dining room is spectacular.


A tulip table is always a fantastic choice. These image are from Sentrell Design Studio.


A Life's Design blog featured this dining room a few months ago. The slipcovered sideboards break up some of the wood tones that usually feel heavy in a formal dining room. 


Beth Davis Interiors


Sarah's House Season 4.

 Sarah Richardson is one of my absolute favorite designers, so she gets TWO places on my dream list.


This casual dining space from Sarah Richardson's lakeside cabin uses painted banker's chairs and an old farm table.


Ah, slipcovers! Bring on the bacon hands kids, they are invincible. I don't care for the sloppy ones, but a crisp, tidy fit makes me love the versatility of slipcovers.

Today we're linking up with The House of Hepworths!


Shabby Chic Settee: How far would you go for that Craigslist score?

$
0
0


Ah, Craigslist.... it's like a flea market, garage sale, antique shop, and 1980's party all wrapped up in a convenient, don't-have-to-get- off-the-couch, online package. Hopefully you read all my handy tips and advice on buying and selling with Craig. But today is just for fun, and funny... that is, it's funny now. Be warned that the following is a confirmation of why I will NEVER win mother of the year AND why I need a 12-step program to help me detox safely from Craigslist trolling. 

When we were building our house, I was like a caged animal that had just been released. I was bound and determined to move into my new house in the morning and be rolling out rugs and hanging draperies in the afternoon. By evening on move-in day, the new place would look like a spread in Traditional Home magazine. To achieve this miracle, it would take a lot of obsessing careful planning. As usual I was trying to stretch my beer budget to accommodate my champagne tastes. Enter Craig and his list.


Here's my recollection of what is now being referred to as  

Settee-gate:

Two of the boys were at preschool and my youngest son was with me. We piled in the mini-van for a cross country trip to downtown Raleigh. (Not really cross country; but I don't often leave my three-mile radius bubble, so a 20 mile trip involves packing a lunch and cooler--I'm not kidding!)

I had exactly 46 minutes to get there and back.

Usually I can accurately gauge the situation at hand and I rarely get the heebie jeebies or feel scared in an alley, etc.  I grew up never having a locked door, so I'm not at all paranoid about being napped by the boogie man. And, most of my friends would agree, one DIY home improvement project with me and my captors would be paying Patrick to take me back. 

SO, I was completely unprepared for the chill that ran down my spine when I turned the corner past the Governor's mansion into the straight up HOOD (urban dictionary defined as:  a place where plenty of $*!# goes down like gangbangin', drug dealin', killin', a place where you wouldn't want to be.)


This is pretty close to an accurate portrayal of my surroundings. Only thing missing is your neighborhood drug dealer and maybe a prostitute or two. I apologize but there really wasn't time to snap pics that day.
It would have been appropriate to let you know that we weren't in Cary anymore. However, the 2 year old in the backseat couldn't care less.


As my minivan refused to cooperate with my fifty-seven point turn to get into the parallel parking spot (on the street), I gazed up at the turn of the century marvel in front of me. I wish I had a picture, but that was a long time ago before blogging, so try to imagine it with me.  Catherine tried to convinced me that it would be unprofessional not to include a pic and therefore we should try to find the place again and do a drive-by (photo) shooting, but I think I've blocked the exact location from memory.

So, you'll just have to use your imagination.

The house dripped in gingerbread trim. RED gingerbread trim. And not a good red either, a barfy rust-burgundy atop gray peeling siding that hadn't been painted since 1956. The wrought iron railing up the stairs was painted a different barf-red, as were the concrete steps leading to the rickety porch. 

I took two steps at a time up the concrete crumbling stairs and stopped. A feeling of impending doom swept over me like a ton of bricks. I thought, hmmm, what if this guy is a psycho, axe murderer who is going to torture me and sell my child on the black market? I slowly backed up to my van and cased it for a weapon. 

Daaaannnng! Nothing. 

Why couldn't the kids have left a smelly cleated shoe or a bat or something? Oh yeah because they suck at sports and I refused to sign them up for anything else, therefore, NO sporting equipment to be found.

I reached under the seat and felt a plastic fork with some BBQ residue on it. That'll have to do. 

Armed with my plastic fork (it might have even been a spork), my son and I rang the doorbell which was barely hanging on by it's wire. 

Almost instantly a hippie-looking dude in a Bob Marley shirt appeared in the doorway. Shakily, I said, "I'm Jacki. I'm here for the settee."

His response set off more alarm bells in my head. In a low, creepy serial killer kind of way, he says, "It's upstairs....in my bedroom...., come on up".  While there were alarms in my head, my heart was like, "Do it girl, you know you want to". 

Frozen. 

I did not move.

My son raced up the stairs like he was being chased by the rats who no doubt occupied many areas of this guy's house. 

Still frozen.

Sensible me thought, I have to save my child from certain death, and scaredy-cat me said, forget the kid, you can make more. 

My third son is a real charmer, and in that instant I knew I'd miss him if he were chopped to bits, so I gripped the fork in my pocket and climbed the stairs after him (and my settee). 

Some kind of fear-induced adrenaline set in and my super-human strength and speed were realized. As quickly as humanly possible, I shoved $60 in the guys hand and threw that thing over my shoulder and ran back down the narrow staircase. He would have to catch me before he could chop me up!

I flew out the door and practically threw the settee down the steps just missing the back bumper of the minivan. Marley dude tossed the cushion over the railing to me and shut the door with such force, the dingleberry doorbell shook. 

I took stock of myself and my child. We were alive and well, breathing not bleeding. Then it dawned on me that I had to put down all the seats to get the dang thing IN the van. Um, what to do with the kid? I glanced back at the door still reeling from it's abusive swing and thought, I need to just get out of here. 

Another super power presented itself at that moment. The super-power to throw every single piece of junk in my van up to the front seat. I got all the seats down and the bench loaded in record time. At this point I am sweating profusely and cursing loudly as my son sits in his little booster seat on the sidewalk...in the hood.


He looked a lot like this!


I said, "Honey, we ran out of seats, do you think you could hide from the Po-Po and keep low?" You would have thought I had given him a bag of Jolly Ranchers. He squealed in delight at the prospect of riding in the car with no car seat. He jumped in as I was tossing the seat on top of the pile of clutter now residing in my front seat. I ran around to the driver's side jumped in and locked the doors. Whew. I took a breath and looked in the rear view mirror at my kid climbing all over the "new" bench in the back. 

Just then, there was a Rap, Rap, Rap at my window. I jumped so hard I hit my head on the sunroof. It was a homeless guy asking me for money. I tried to crack the window, but the darn thing has the auto down feature, so of course it went all the way down where he could grab me. I frantically tried to raise the window while I pretended to look for some money. I didn't have any money because I just gave it all to Bob Marley. 

In a squeaky voice, I said to the guy, "I don't have any money, but I have some Scooby Snacks." (Seriously, I told you I packed for a long trip.) We ate our bananas on the way, but the Keebler Graham snacks in the shape of dog bones remained in the bottom of the Transformers lunch box. (We travel in style.) 


That answer seemed satisfactory so I rolled up the window and high-tailed it back to suburbia as fast as my mini-van would take me. 

You may be wondering what treasure could've possibly warranted this adventure...

This fine creature:
Of course it was blah-brown and the upholstery was Grandma's floral, but I saw it's inner swan!

It sits in my bedroom in all of its fabulosity. Why you ask? Not because we're entertaining in there. Mainly for looks of course.

This is how it looks most of the time:


But, I think it fits perfectly in this little nook, don't you? 

Six years later, (read: far removed from that crazy day downtown) I'm really happy I have it. 


Disclaimer: Never try this for your home! Always apply common sense to any Craigslist transaction and trust your gut (unless yours also says "do it girl, you know you want to").

If this doesn't get your weekend started off right, I just can't help you!

We're linking up with Blissfully Domestic.

Blissful and Domestic


check out these great ideas:
l

Porch Love!

$
0
0


As you know, we just moved two weeks ago (hence the M-I-A blog life). Read: Instead of telling you how to make your home adorable, I've been nesting in mine. But, can you really blame me? We lived out of suitcases for two months. 

While the rest of the house looks like a box bomb exploded, the porch sure is serene. It's a great place to enjoy a cup of coffee in the morning and listen to nature do its thing while safely screened in from "actual nature". 

A screened porch is as southern as sweet ice tea and grits and you're one lucky gal if you have one at your house. Since our house came with one and there were no boxes to be unpacked on the porch, I got busy setting up shop!

I found this coffee table and ottoman on Amazon (love free prime member shipping!) and it coordinated perfectly with my existing wicker chair from my last (covered) porch. I just need to find a new cushion and now is a great time to do it! I only need one and it's outdoor furniture clearance time! It shouldn't be too hard to find!

Scored these sweet pillows at Lowe's, on clearance last week!

The dog refused to move and I couldn't wait any longer. His name is Buster and he's my first baby. 

You may recall this rug from my last kitchen. It is indoor outdoor so it will work perfectly!


If you're wondering where I've been, now you know (between opening boxes that is!).

Today we're linking up with:


Family Room Botox

$
0
0
One of our client's had been decorating with jewel tones in her family room for many years and was ready for a budget friendly update. 


She loved her beautiful built-ins flanking the fireplace (who wouldn't?) and needed to keep her fairly new sectional. 


Don't mind the hubby's shoes and lack of pillow styling. We're all about REAL life here!

She promptly sold her Pottery Barn rug on Craigslist and found a brand new rug on eBay (that's my kinda gal). That purchase dictated the color palette for the room and off we went!


To inspire this color infusion, Jacki and I promptly went accessory shopping at TJ Maxx.  Unfortunately, we missed this orange throw and had to wait for another one. But, you know what they say...good things come to those who wait. And we found this gem at Tuesday morning!


Our client was also looking for a new club chair for additional seating in her family room and we snapped a pic of this beauty. 

I love the pillow!

It wasn't the right one so we kept looking!

This fine fella sure was inspirational! Well placed accessories can make all the difference.


Jacki whipped up this mood board in hopes of convincing the client to sell the sectional and get a different one but was turned down flat...wah, wah, wah...So, we'll just work with what we have!!

Our client wanted a guide and planned to then implement the changes herself. Here's her progress so far! 


Accessories are a great way to get started on a small budget makeover. And, I've been known to say...there is no such thing as too many pillows.


I love her DIY teal table and the teal tray on her Ikea cocktail table. 


Her daughter is an artist so she "commissioned a piece" for over the couch and used her accent pieces to fill in and provide a color infusion in the new palette.


How perfectly perfect is this rug?


She bought this chair on craigslist and plans to get it recovered for her current family room.


We suggested the possibility of painting the back of the built-ins with one of the accent colors for bolder color saturation but the accessories get the party started!


We're still working on the perfect gray/tan paint color. As it happens, the Benjamin Moore revere pewter was too dark since her family room has a ton of shade!

What do you think of this transformation? Orange you glad you stopped by today? I am! Have a great weekend!

We're linking with:


Blissful and Domestic


check out these great ideas:
l

Blog Cabin 2013 Mega Den: What's your favorite?

$
0
0
My youngest son has been begging for bunk beds. My search for a solution for his room with awkward angled walls led me to the nifty murphy bunks DIY Network used in the 2013 Blog Cabin. 


Is this the most brilliant set of beds you've ever seen? Think it's cute open? Take a look at it closed:


The area around New Bern, NC has some of the prettiest scenery you can imagine. Did you see the movie Safe Haven? It was filmed in Southport, which is just down the coast line south of the Blog Cabin location. 

Originally built in 1892, this cedar shake cottage has been completely transformed. My favorite room in the house is the Mega-Den. 


The entry greets you with a reclaimed barn wood sliding door you can close to keep the sound from traveling down the stairs. A comfortable sectional and an old trunk found in the original home create a great space for curling up for movie night.


Check out this upcycled antique wardrobe joined at the hip with a low dresser. The brilliant minds at DIY added a wine chiller in the closet section and turned the top of the dresser into drink server. It makes me want to mix a cocktail! Cheers!


This fabulous upcycle reminds me of the multi-purpose wardrobe I found at in Ocean Isle for our beach cottage. The room has no closet and I often bring sundresses and other clothes that need to be hung up, so I wanted a small closet space and a dresser all in one.


This mega den serves so many purposes and utilizes found pieces with character (something we try to infuse into every space we design). A room without pieces that tell a story is just a room that you can order out of a catalog. This neat little wardrobe ended up costing about $3,000. Why you ask? Because Patrick wrecked his truck getting it for me. I have so many stories of near death experiences, and bat-doo crazy people from Craigslist, this one is no exception. (More on that later.)


Visit DIY Network's home page and tell us which Blog Cabin room is your favorite!

Today we are linking up with:

Gallery Wall (take 387) I WILL get this right!

$
0
0
Wonder what we've been up to? Well, while Catherine unpacks boxes at her new home, I've been playing around with creating a gallery wall in my family room.


My gallery wall upstairs went so well I thought this would be a cinch! I must've been younger when I did that one. This wall is wearing me out!


 Here's Round 1:


I don't even know what to say about myself? Am I mentally disturbed? I guess I didn't like the clutter on the Pottery Barn Holman shelf. There's a fine line between "accessorized" and "junky".

Round 2: 
You may remember our post about my obsession with etageres.


The pair was too much so I downsized to one and moved the other one to the opposite wall. Again, I was looking for a balance of books, accessories and open wall "space to breathe".

The other etagere moved upstairs to my kids' playroom.


In my spare time in the wee hours of the night, I researched (read: lost hours of my life on the internet) gallery walls for inspiration. 
Insomnia; if you are listening; go away!

Here are a few examples I found in my "research". 


Of course you can always count on Pottery Barn for amazing inspiration.


This is the Navy paint color I've been trying to talk Catherine into for her office. I'm so close!!

OK, so back to me. I started by laying my pics out on the floor to see what configuration I liked best. Even though that clearly didn't help avoid 627 holes in the wall. Keep reading. 


Paring it down a bit.


What I finally decided to put on the wall. 


The black frames on the side were too stark, so I removed them. Plus, I was not going to be satisfied until there were at least 1,000 holes in the wall.


This is looking pretty good, but those black frames and black mats are still drawing your eye straight to them. I wanted a more soothing grouping that looked like it had been collected over time. 


I removed the black framed pencil drawings of the boys and relocated them in the house. They were messing up the whole mojo.

Now for the console table!


This is the Everett Foyer Table from World Market. Just try finding something extra long and extra skinny; it does not exist on this planet! 


Mixing wood tones has always been something I see as a key to creating a room that looks accumulated and not purchased from a catalog. This table has two drawers on which I will put some cute knobs. The grey-wash distressed vibe is just what I was looking for. 

Time to take the truck out while Patrick was at work.


You want to know something funny? I passed Patrick coming home from work with my new friend "Everett" in the bed of the truck. He immediately texted me, "Kingdom?" I almost ran off the road laughing. If you haven't read Victoria's "Kingdom" post, click on over and check it out. You will crack up and you will understand the term: Kingdom.


Mr. Everett in place. Oh dear. What have I done. It's drab and tan on tan on tan.
Daaaannnnngggggg,  why did I get rid of those Holman shelves? Excuse me, lady on Craigslist that bought my shelves; can I have them back?

No, I will not give up. I am determined to have a gallery wall and I SHALL have a gallery wall. More nails; that's what I need.


Okay, I can work with this, but something is still not right. The lamp!

Must. GO. Lamp. Shopping.


YES! I found this neat clear glass lamp at Marshall's. I loved the burlap shade and the top comes off so you can fill the base with your collectibles. Cool. 


It just so "happens" that I have a bottle cap collection. 


No, we didn't drink all that soda. I found these unused cork-backed bottle caps at a flea market. They are from a soda plant in Concord, NC that was closing. I LOVE Cheerwine. If I could have, I would have filled the whole lamp with just Cheerwine caps. But, alas...

I found this while shopping for lamps. 


It is identical to the one they sell in Arhaus for twice the price! I was already in LOVE with my fat fake candle that is on a timer (2 hrs, 4 hrs, or 6 hrs), AND has a remote control. Since I once burned two perfect holes in our ceiling from having lit candles burning on my mantle during a party, I have been banned from real candle use, so this thing was like winning the lottery. It has kind of a rustic-elegant charm, don't you think?


Disregard my lazy dog. She was pooped out from taking the boys down to the bus stop this morning.

Now this is taking a TO DO to a TA Da! I'm pretty happy with this configuration, but you never know when new inspiration will strike.....


Thanks for stopping by today; feel free to leave a comment for us!
Linking up with....

A Bowl Full of Lemons
Memories by the Mile

The Lazy Girl's Guide to Easy Fall Decorating

$
0
0

Hey Y'all! I'm trying REALLY hard to get in the spirit of fall decorating. Retailers are strongly hinting that we should not only put a pumpkin on the front porch, we should go ahead and stock up on Halloween candy (BIG mistake folks, trust me on this one!).

I must confess that even with all the subtlety of Target and the like,  I am still not motivated to git 'er done since it's 90 degrees outside. Alas! The weatherman promises fall weather will be upon us- tomorrow!!!

But the heat isn't my only barrier to Southern Living worthy seasonal decor! It's kind of a pain to get all that stuff out and arrange it.  Fear not, the following are tips that even seasonal decorating slackers like myself can use.

If you can do nothing else, get a wreath, (or two if you have double doors like Jacki)
Jacki's front door. Pumpkin topiary tutorial coming next week!

Even if they don't say it, the UPS guy and your neighbors appreciate a nice wreath on your door. If you have even one ounce of talent, you can make a nice one from a few materials gathered at your local craft store. If you have NO talent in the wreath making department, find a talented friend. Lucky for me I have Jacki :) 


If you have no talented friends, the fine folks at AC Moore or Michaels can whip up something for you in no time. 
HGTV.com
You can see this stoop didn't stop with a wreath. Add a few mums and a pumpkin or two and voila, you've got a fall vignette for the world to see!
bhg.com


Go all the way!

What I mean is ... decorate for fall, not Halloween. Sure, if your inner Martha Stewart is getting antsy and you want to go all out with goblins and ghosts, have at it. 


source

For the rest of us that practice good (enough) seasonal decorating, my suggestion is to focus on fall decor vs. specific spookiness. 

Martha Stewart
If you decorate with leaves and pumpkins, you can start now and won't have to haul it all back up to the attic until the day after Thanksgiving. You can always work in a few Halloween specific items during October for a little flair! Just don't forget to take them down on November 1. Nothing says tacky like Halloween in February. 

 Swiss cheese pumpkin rat tutorial coming soon!

BONUS: When you do pack it all up and head to the attic, you can grab the Christmas stuff.

Pace Yourself!

Not only am I a bit lazy about seasonal decorating, I'm kinda cheap too. Sure, we all want to zap our homes with a retail wand and have a catalog worthy mantle but Rome wasn't built in a day. You can add a little bit to your collection each year and supplement with some natural decor such as seasonal flowers or foliage at your home or maybe your friend's home (Again, thankful I have Jacki!). 


If you buy one or two artificial pumpkins each season, in a few years you'll have a beautiful collection. Bonus: They won't rot in the compost pile. 
 

This one, Jacki "bedazzled" with one sheet of stick on jewels from the craft store.

Focus on the front!

Work some magic at the front door, inside and out. Even if the rest of your house doesn't have all the little fall touches, you can at least decorate a vignette in the foyer. Afterall, it's the first thing your guests will see when they visit. 


Miss Flibbertigibbet

Keep it simple!


No need to go crazy draping every horizontal surface with leaves and corn husks. A simple threesome of mercury glass pumpkins will take your decorating from September through November.

I hope we've inspired you to get your house ready for the upcoming beautiful season of football, falling leaves and cooler weather--at least just a little!

Have a great weekend!


If you are visiting from http://www.findingfabulousblog.com/The spider felt came from Michael's craft store. A little hot glue and some black rhinestones and viola! Fancy pumpkin! Check out the fantastic, frugal ideas on the Shabby Nest: The Shabby Nest

Tween Room fit for a queen!

$
0
0


Hello adorables! Welcome to the first glimpse of what I've been up to for the last 5 weeks! Since we were slightly homeless for the summer, I was anxious to let out my inner decor diva. 

The project I was/am most excited about is my 9-year-old daughter's bedroom. Literally, 2 hours after we closed, the room was transformed from builder beige to Sherwin Williams Cooled Blue! 


Lots of times it is difficult to know exactly how you want to lay out a room BEFORE you actually move in the space. Not this one. I'm a die-hard Pottery Barn bedding fan and have been addicted to their children's furniture since this lil' girl was the size of a peanut! I knew exactly what I wanted and how I could use her existing furniture and layer in some new stuff for a totally tween room. 

Before we moved, I was busy ordering bedding and sending Jacki off to Ikea for this awesome light fixture that we used in Ruby's playroom. It was too adorable not to imitate. 


Ikea Maskros Light (small) $50
I am not too proud to admit that I essentially bribed my daughter to keep her wrought iron bed with the promise of new bedding. And, since I adore layered bedding, I knew I wanted a quilt and a duvet with complementary patterns for added interest and texture. Plus, my daughter loves to snuggle up in her cozy covers. Who wouldn't, right?

I started with the Pottery Barn Teen Crinkle Puff Quilt and two euro shams.


Next, I added the PBTeen Swirly Paisley Duvet Cover with two standard shams. (I already had the down insert from her last set of bed linens.)


To be honest, I think my version looks better than theirs!
Since my girl is an animal lover, I topped off the fluff-tastic set with two of PBT's pillows whose sales benefit the ASPCA.


Her bookcase fit nicely in the space behind the door. My handy hubby installed a door stopper that won't let the door open fully so we won't have a permanent dent in the side of the bookcase.


Her bookcase is mainly about practicality since she's an avid reader. But I couldn't resist this adorable "S" representing her first name on a turbo shop through Homegoods. My 5-year old was with me and was dying to have an initial of his own. Since we couldn't find a B (the first letter of his name), he said he was willing to settle for an E (the 2nd letter of his name). Bless his little learning-to-spell heart!


Near the windows we added a cozy chair for reading. It is actually the Pottery Barn Kids dream rocker from about 10 years ago. It has gotten several makeovers by way of custom slipcovers. I was going to show you a few pics of the (almost) nine lives of the PBK dream rocker but it turned into a long, sordid tale that I'll save for another day. 

Long story short, we took the rockers off and added turned legs since we aren't rocking any more babies around here. I just love it with its new slipcover!


Change the World pillow from PB Teen.
Last, but not least...we scored a DEAL on curtains. These bad boys were 2 for $10. No, that is not a typo. Three windows got dreamy little sheer-ish curtains from Ikea for only $30. And, my BFF Jacki hooked me up with $7 rods at Ross! Three windows for under $55, can I get an AMEN?


We still need some art work on the walls and her desk will go next to the dream rocker opposite the bed but I just couldn't wait to share with our adorable followers. If you want us to whip up a room for your tween, just give us a call!

We are linking up with these fine folks:


        Skip To My Lou Sumo's Sweet Stuff  Keeping It Simple

Pottery Barn Kids Dream Rocker makeover

$
0
0
A few days ago I blogged about my sweet, tween room and showed you the latest version of what used to be the Pottery Barn Kids dream rocker.


Jacki tells me I have an unnatural attachment to this chair and honestly I cannot disagree. Since we both buy and sell almost every week on Craigslist, you may have noticed I'm not all that sentimental about "stuff". Buy it, use it, sell it, whatever. 

It really isn't my usual behavior to hang on to something like this. At this point, my feelings could best be characterized as a long term relationship since there is not one other piece of furniture in my house that I've had that long. 

When I was about 5 weeks pregnant (not a joke), I had my nursery all picked out. Portraits would be made of my baby and me in this super fab rocking chair. Reality: there were more bodily fluids lost on that chair than I can even list--mine and hers--eww! Thank goodness in the fog of being a new mom I had the good sense to buy something with a slipcover (read: Jacki probably told me to do it since she had already popped out three little monkeys by the time I had my first!)

It originally started like this:

This isn't it exactly but this one is very similar.


Yes, I was reading to a 5 month old who was way more interested in the flash on her dad's camera.
There were many sleepless nights spent rocking a reluctant (yet oh so sweet) sleeper. And, honestly it was a bit deep and not super easy to rock (especially after a c-section?) but it sure did look cute.

In our next house, it went in the playroom.

I remember taking this pic because I think it was the first time she fell asleep spontaneously.
Yes, you are correct, she was about 3. 

OK, you may have gathered that we are serial movers. 

In our next house, the rocker got a makeover but kept its place in the playroom. 

Check out that Daddy and his lil' cubs! Rawr!

A little funky but I like it, don't you? And, that pattern sure did hide a lot of kid action!

Now it is on its fourth round at our house. We ditched the rockers and added turned legs since we're fresh outta babies to rock. I love the clean white twill. Our daughter is pretty tidy and the kids don't eat in their rooms so it has a fighting chance at staying white. And, let us not forget, it is a slipcover so it can be washed!


If you're looking for a great custom slipcover seamstress, look no further. We found your gal. Check her out here. Tell her Decor You Adore sent ya!

Happy Hump Day! Make it adorable!


Easy DIY Pumpkin Topiary Tutorial

$
0
0
Easy Pumpkin Topiary Tutorial
Fall decorating is in full swing.

Step 1: Gather your materials!


I started with three pumpkins of varying sizes, some fall picks, leaf garland and grapevine garland.


This urn was lying around the backyard, so I tossed out the dirt and the dead plants to up-cycle it for its new purpose; my base.


These are the three pumpkins I chose, mostly because that's all that was left at A.C. Moore. Geez, do I have to start my fall decorating in July? The fall section was almost wiped out already.


 Some natural burlap-y ribbon for my bow on top.


 My garland was on sale for about $4 a strand. I used two.

Step 2: 
After combining the leaves and the grapevine, use your hot glue gun to adhere it to the urn. This was super-frustrating because my gun was leaking all over the place. OOOH! Doesn't Craftsman have a guarantee? Hang on while I go get it out of the trash can. I WILL drive 11 miles across town to Sears for a new one, just not today.


Ok, I'm back. Hmmm, I still have some holes where you can see the dark abyss of the bottom of the concrete pot. 


 Solution: Stuff the holes with random fall picks, twigs and berries.


Do you recognize this wagon? So multi-purpose!
Step 3:
After you get your base looking full and festive, the next step is to add a medium pumpkin to your totem pole. 


Well, now that the hot glue gun is out of commission, I had to get creative and come up with a way to affix the pumpkins so they'd withstand some fall breezes and rowdy trick-or-treat'rs. 


Continue adding pumpkins until you are happy with the height of your topiary.

Step 4: Skewer!
This makes me hungry. But it did the trick! The foam (or whatever these things are made of) was just soft enough that it was easy to poke the wooden skewers through without using any tools.

Now, you repeat Steps 2-4 until you have the desired number of layers. If you go higher than three I would suggest adding a dowel to the center for support.


Step 5: Add a bow!
This is a gift for Catherine. I'll be taking it over to her house tonight after we study for a Geography test (6th grade is really hard btw).

Hers is a little more "embellished" than mine. I promised last week I would show you how I made my pumpkin topiaries, so here they are.......


This is what my front porch pots look like most of the year. I add spring flowers and Christmas lights, so these planters are very versatile. 


I kept mine fairly simple since there are two planters and they are four pumpkins tall. 
 About every two or three years, I have to give my pumpkins a fresh coat of spray paint because they fade in the sunlight. The initial investment was well worth it though, because I can add a bunch of real ones to the mix without breaking the bank.


 I used a dowel rod on my topiaries for support. 


This year I added some grapevine to my pumpkins to give them a little more texture.


This is what my front porch has looked like for the past three fall seasons. The bucket arrangements were a tad tired so they got benched. Don't worry, I plan to use those Southern Living Door Buckets to make some cute spring door-adorables.


Here's how I replaced the faded flower buckets! For $25 I couldn't pass them up!


To sum it up, this year, I added a fresh coat of spray paint, a new fall garland and some grapevine. I have some Halloween bat lights that I'll bring out in October along with whatever kind of crazy jack-o-lanterns the kids carve. 


I hope you enjoyed the tutorial. We'd love to see what you create with artificial pumpkins!

For more fall decorating ideas check out
Blissful and Domestic
The Shabby Nest
One Artsy MamaSerenity Now
Practically Functional Link Party

Play Room loft

$
0
0


We moved in about six weeks ago and slowly but surely the place is becoming a home! 

Last week I showed you my tween daughter's room and the Pottery Barn dream rocker makeover

Jacki and I had such a fun time doing Ruby's playroom this summer and since we were moving, I knew I had an opportunity to do a fun room for my kiddos too. 

Here's my very blank canvas:
Even while under construction I knew it had cute potential!

It all started with a little paint--Benjamin Moore's majestic blue.

I've said it before, if you can do nothing else, paint!
The space we have to use is just an open area at the top of the stairs. There is no closet to hide legos, beyblades and the like so I was definitely interested in clever storage. Enter the Ikea trofast system. We discovered it when we did Ruby's room and it was awesome. Not that expensive, easy to access (for kids) and super cute--win, win, win! 


You may recall that Jacki is the crafty part of our duo so my kids are--ahem!--a bit deprived of arts and crafts. However, I've been inspired by Jacki and Ruby and wanted to offer a little creativity to my children. 

While near the Ikea in Charlotte, I texted my hubby a list. Before you ask, yes we're still married. He managed to get the craft table in his sub-compact rental car. Obviously, he loves me a lot!

Yes, that's a craft table over his head and the legs of 2 wicker chairs next to his ear! Doesn't he look thrilled?
We got this table 


and 4 of these stools. 

At $6 each, you can't beat them!

Since we didn't end up taking the doors off the closet in Ruby's playroom, we had a set of Janette curtains (proudly modeled by Jacki below!) leftover. Using what we had...we topped off the space with a set of funky, fab curtains!


We're not finished yet! We will add the Ikea by-gel rails above the table to corral art supplies with little hanging cups. 
We actually had the large green chair from my daughter's room in our last house. Can you believe how perfect it is?

And the space needs art on the wall badly. No worries,  I have plenty of kid art I can't wait to display. But, mama needed the legos, et al off the floor or somebody was gonna get hurt. Seriously, have you ever stepped on a lego in the middle of the night? My c-sections weren't that painful!

Have a great day and remember to make the most out of every space you have available!


Memories By The Mile
homework

DIY Fall Banner/Pottery Barn Hack! {Special Guest Tutorial}

$
0
0
Ok, ladies (and our two male readers)... It's confession time!

Raise your hand if you've had a Pumpkin Spice Latte in the past week? It's ok... No one's keeping score...er, counting calories--except maybe your skinny jeans.

via
You're not alone. Now that Fall is officially upon us, we're all itching to wear our favorite boots, taste all things pumpkin and  drooling over the abundance of fall decor, too. Have you seen the cute banners on Pinterest and Etsy? 

via
Now you can have one of your very own. My sister, Kelley, is guest blogging with us today to tell us how she made her cute fall banner pictured below. Take it away, Kelley.


Hey there and thanks for having me!

A couple of years ago, I was cruising through Pottery Barn admiring all their festive decor. I particularly loved their Trick or Treat banner but really wanted something that would last throughout the fall season (I guess I'm kinda like my sis when it comes to seasonal decorating).


So, I went home and channeled my crafty side. When I made this sweet little banner I never thought I would love displaying it so much year after year. With this simple tutorial, even the least crafty nester (like myself) will be well on her way to a cute banner in minutes.


So, here's what you'll need:


  • Microsoft Word, or similar word processing or design software
  • Color printer
  • Scissors
  • White, 8.5 x 11 card stock
  • Ribbon
  • Exacto or craft knife or small hole punch
First, launch Microsoft Word and create a new document. Start by inserting a text box.


In the text box, enter the first letter for your banner. Next, highlight and format the letter. You may center it, change the font, the color, etc. {Note: If you want some cool free fonts, checkout this website.}


Next, right click on the text box border. Then, click on format shape and select the line style you would like to use for the border. You don’t have to have a border but it makes cutting a little easier.


When you have your first letter ready, print it. I like to print mine on white card stock so they are a little more durable. Once you print it, then cut it out and make sure it is the size you want. If it isn't the right size, just go back into Word and tweak it until you get the desired look.

Next, using an Exacto or craft knife, cut two small slits in the top for the ribbon to weave through. Be sure to cut these to the size of your ribbon. You may choose to use a small hole punch to make the holes instead. Just remember you only want the holes or slits large enough to accommodate your ribbon. 

To keep it simple, I like to get the first letter formatted and sized properly before creating the next letters. Once one letter is done, you can print, cut, create the holes and then repeat using the same text box and font with the new letter. That way your document is already formatted and you don’t have to recreate/format the text box, font, color, etc. You only have to change the letter each time.

The fun of this is in the creativity so feel free to freestyle it! Try some triangles. Or go without ribbon and just glue the overlapping triangles. Most importantly, have fun and make it yours.

via

I hope you love your banner as much as I love mine! Happy Fall!


Roll out the welcome mat!

$
0
0

With the first days of fall behind us and waking up to a bit of a nip in the air, we can't help but think of the upcoming holidays! Obviously you know it's been on our minds since we've featured several ways to decorate for fall. If you missed our lazy girl's guide to fall decorating, our easy DIY pumpkin topiary tutorial or our guest blogger Pottery Barn hack fall banner, you should check them out! 

When you visit, the first thing you see is the front porch, stoop or landing. Make it say, come on in y'all!

If you're low on time, try welcoming guests with a new, stylish welcome mat! This quick and easy strategy applies to any season but is especially sweet as we head into the holidays. 

Love it!
source

Of course I cannot resist something personalized like this one I got for Catherine from Personalization Mall.


I found this cutie there too and snapped it up for the beach house


I have to be honest, I stumbled upon these in my search for a double wide mat for my front doors. I have this one from Frontgate:


It's been stepped on, wiped on, peed on and who knows what else for nearly 6 years. It's time for a replacement.

Here are some options, which one of these is your fave?

And, no need to be coy...

Who needs a security system? Just be honest with potential thieves. This one says it all don't you think?


You know I like a DIY project just as much as the next gal, but I'm not crazy about coir. Curbly did a great job with here project, but I wanted to find something a bit softer.

Step by step instructions on Curbly's blog
Have you put out your fall welcome mat yet?

Sharing with these folks:


The Shabby Nest
Chic on a Shoestring Decorating
Reasons To Skip The Housework

A Few of Our Favorite Things.... For FALL

$
0
0


Y'all! Who doesn't love fall? It is such a great time of year. The weather is a little cooler and the holidays are just around the corner. Just like Oprah, we're gonna show you a few of our favorite things. (Note: no one is getting a Pontiac.)


Owls are B-I-G this year it seems. Whoooo doesn't love the big-eyed beauties? Look at these sweet measuring cups from World Market. Their heads swivel off for one measurement and their bodies are for another measurement. Kinda creepy but still fun!


These are awesome! Can you imagine how happy they would make you if you plugged them into a timer and they just turned on at a certain time each night? Blissful!


Again, it's all about timing! Glass punkins with self-timers! 

Brilliant!


Valerie Pumpkins with timer: QVC.com

Your porch needs this. OK, need may be a stretch but your porch definitely wants this. 


No matter what, there is always something to be thankful for! For instance, a deal on some cool, fall place settings!


We told you that first impressions count. Make it a good one with a wreath like this!


Besides yummy pumpkin goodies, what are your fave finds for fall?

Linking up with:

Decorate your business for Halloween!

$
0
0
My sister, (the English major), owns a Mathnasium in Tampa, FL. Do you know what goes hand-in-hand with Math tutoring? 
Kids! 
Children of ALL ages love Halloween, right? 


After seeing our Pumpkin Topiary Tutorial, she asked me to jazz up some artificial pumpkins for her store. No problemo chica! We ran over to the craft store and got some carving pumpkins in a few different sizes.  
The owl represents wisdom in Math. Wisdom I do not possess by the way.


We created the A+ by simply applying adhesive backed craft jewels to the face of the pumpkin. The small pumpkin's web was created the same way. Add a spider and you have a fabulous, economical pumpkin that you can use year after year. 


This one was made by hot gluing sequined spider garland down the seams of the pumpkin. Cute, don't you think?

Linking up with:
<a href= photo partybutton1_zpsaf59da8f.png
”MadeMade in a Day
The Inspired Room 
Do you want to check out some more amazing ideas? The Inspired Room is one of our favorite blogs!
Made in a Day

Design Dilemma: A Little Boy's Room to Adore?

$
0
0

I gave you a peek into our daughter's room a few weeks ago. It was such a fun space to work on. But, the adorable son is feeling a bit left out. 

Here's his room during construction:


It is small but plenty of room for a 5-year old. 


I like the fact that both kids have full size beds so we can kick them out for overflow guests :)

However, while visiting Jacki's beach house this summer, both my children decided they wanted bunk beds in their rooms--arrrrgh! Thankfully, my husband and I are adept at manipulating helping our children see reason. 

Originally he wanted one of these:


What little boy wouldn't right??

That bad boy is $2,000 at Pottery Barn Kids. Yikes!!! Definitely not in the budget-no matter how awesome it is. After some internet obsessing research, I found this uber-awesome site, that gives you detailed, step-by-step instructions (shopping lists too!) on knocking off this piece and hundreds more. 

Here's the one she made:


So my hubby was planning on breaking out the power tools. That all seemed like a great compromise (except for those overflow guests that would be scaling a ladder in the middle of the night). Then my lil' man found out that Daddy couldn't lay down with him in a twin size bunk bed. My son is IN LOVE with his Dad (ya know, I totally get it!) so that was a no brainer for him. A week at the beach in bunk beds is a treat, but night in and night out without Daddy "sleeping with you"...um, no thanks!

Back to the drawing board...

Here's where we are now: 


I like the paint color (Sherwin Williams Kilim Beige) and the comforter and custom made valance that we used in our last house


We added this dresser that I scored on Craigslist:

That is, in fact bamboo sticking out of an owl's head.
Is that quintessential little boy or what?

He has this chair from Pottery Barn Kids and uses it for reading. 


Personally, I could take it or leave it but he wants it, and it's cute, so why not?

Here's a hand-me-down night stand that has GOT to go. 

He was so desperate to have a letter in his room, he stole my "S" paperweight from the office.

I was thinking maybe a campaign night stand to match the dresser?

I actually already bought a campaign night stand on Craigslist, it just needs to be painted. That's a thought...

The aforementioned 5-year old would like to see his room painted "red, white and blue". His kindergarten class just finished their patriotic/American History chapter so I suspect that is the inspiration for this Americana decorating scheme.  I'm here to tell you THAT is absolutely NOT going to happen. But, I'm thinking I can meet him halfway with a wide navy stripe painted around the room. And possibly a thinner red stripe on top of that. 

Kind of like this (stripes, not colors):

theyellowcapecod.com

Now here's where it gets tricky! It is a small room so I don't want an actual bed, just a headboard. What kind do you have for a boy? Let me assure you that pinterest has been ZERO help in this department. 

Jacki's handy hubby designed this one for one of their boys:

I didn't even remember the stripes in this room! Inspired!

Awesome right? It even has lights built in it. But, it is still in service so no hand-me-downs this time:(

Of course Jacki has another headboard in mind for a different son. 

Something like this:


The Art of Upcycling
She got a ton of different license plates off eBay and is just waiting for the handy hubby to have time to put her plan into action. 

So, I want to keep the bedding and add a thick stripe to the walls with a new nightstand. No clue what I'll do about a headboard... And, I definitely want a creative way to display his name since he's so into letters and spelling. And, I will have to negotiate the wall art. Daddy bought him a Minecraft poster that he REALLY wants to hang-ugh!!!

I'd love to hear your ideas. Do you have any suggestions for something creative yet not too expensive?


Linking up with:

The Vanity Room

Liz Marie Blog
Viewing all 118 articles
Browse latest View live


Latest Images